|
 I remember as a
grade-school boy, I would go into our recreation room and play around
an old oak table. The table was round, with four hand-carved legs that
each had the face of a tiger. I would run "pretend" racers around and
around the table, or set up armies and have mock battles. I remember as a
grade-school boy, I would go into our recreation room and play around
an old oak table. The table was round, with four hand-carved legs that
each had the face of a tiger. I would run "pretend" racers around and
around the table, or set up armies and have mock battles.
The table was also the place where we did our ceramics. My dad
was always interested in "artsy" things, so I was introduced early to
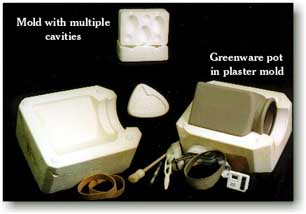
the magic of ceramics. We had plaster molds into which we poured a
brown mud-like substance called "slip." The molds were in two pieces
and were held together by rubber bands. There was a small hole in the
top of each mold. That's where we poured the liquid clay. After about
fifteen minutes, we poured out the clay and then set the molds aside
to dry for about an hour. Then, by removing the rubber bands, we could
carefully open the molds and remove the delicate product.
We had molds of cats, dogs, angels, Nativity figurines, bears,
Santas and many more. The trick was to remove the soft clay pieces
without breaking them. It was also necessary many times to then
assemble arms and legs to the bodies, each step requiring tedious
work. After assembly, they had to dry completely. Once dried, the
various ceramic objects are called "greenware"--they are very easy to
break if accidentally knocked over or bumped together. The greenware
is then painted with a variety of ceramic paints called glaze, each
applied to create a desired finish. I always liked the ones that gave
a "crackled" finish. The different glazes are really simply mixtures
of different rock and mineral compounds that give different colors
once heated to melting. The trick is to know what they will look like
as they are applied, since it often makes a difference which one goes
on first.
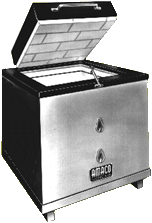
 Once glazed, the ceramic objects are fired in a kiln. We
had two electric kilns, one large one and one small one. The small one
was about three feet square, with room inside for about two shelves of
ceramics. Each ceramic piece was loaded carefully, because wherever it
was painted it could not sit directly on the shelf. If it did, it
would stick to the shelf during the firing process and be hard to
remove without damaging it. Sometimes we laid the ceramic piece on a
special support that had three pinpoints where the ceramic piece
touched it. In that way a part could be painted all over and it would
only rest on three small supports. Once glazed, the ceramic objects are fired in a kiln. We
had two electric kilns, one large one and one small one. The small one
was about three feet square, with room inside for about two shelves of
ceramics. Each ceramic piece was loaded carefully, because wherever it
was painted it could not sit directly on the shelf. If it did, it
would stick to the shelf during the firing process and be hard to
remove without damaging it. Sometimes we laid the ceramic piece on a
special support that had three pinpoints where the ceramic piece
touched it. In that way a part could be painted all over and it would
only rest on three small supports.
The firing process took all night. We used little devices called
"cones" to control the firing process. These little cones were set
under a little moveable pin inside the kiln. The pin was connected to
an electrical switch that was held in the "on" position as long as the
cone remained rigid. However, as the desired kiln temperature is
reached, the cone begins to soften and finally bends resulting in the
switch being shut off to the kiln. It took almost a full day for the
kiln to cool down after a firing, most of the time being taken to be
sure that it cooled very slowly. If the top were opened while it was
too hot, the ceramics would crack and break by the sudden
chilling.
I once took a mold, some slip, some greenware, some glazed
ceramics and some finished pieces to Speech Class at Tyee Jr. High. I
described the process to the class and gave brief demonstrations how
it was done. It was really interesting to the class and I enjoyed
telling about it. I think I got an "A" on that one. Besides,
afterwards I did a fairly brisk business selling ceramic cats to my
classmates!
Mom really got involved in some wonderful ceramic projects. She
bought the molds for making Nativity figurines. It included the baby
Jesus, a manger, a cow, a donkey, sheep, shepherds, Joseph, Mary, the
three wise men and of course, their camels. She assembled all of them
very carefully and then put glaze on to make them look realistic.
After firing them, she then decorated the Wise Men with cloth and
other decorations so that they were quite realistic. She sold many
sets of them. I even talked her out of a set myself!
Dad was always interested in making new things. He and Clarence
Phipps designed the first electronic potters wheel. At the time, there
were very few electronic devices of this type. It had a control knob
on the side that would allow the wheel to spin at a variable rate. The
wheel could also be controlled by a foot pedal. They even went so far
as to consider selling the units commercially. I don't know what
prevented them.

I remember dad would spend hours forming pots on the wheel.
Sometimes he bought the clay from a ceramics outlet store, but at
other times he would try to find native clay. He would scour the
countryside and find places where he could dig out clay. He'd then try
making pots from the clay and making his own glazes. Sometimes the
colors were really different when he used his own clay and glazes of
his own making.
It was fun trying to make pots and feel the slick clay slip
through my fingers. The only problem was that it was messy and took a
long time to clean up after a session.
 Dad also spent time modeling with clay. I still have an
"Indian head" that he was going to throw away. He always was trying to
talk me into letting him make a mold of my face! The way he explained
it, I'd just have to sit in a chair and he would apply plaster to my
face, leaving holes for me to breathe through my nose. Or was it that
he was thinking of poking straws in my nose to breathe through? For
some reason, I was deathly afraid that I wouldn't be able to properly
breathe, or that maybe the plaster wouldn't come off my face after it
had hardened. Besides, I remember that the plaster releases heat as it
hardens, so maybe I was just afraid that I'd fry my face or something.
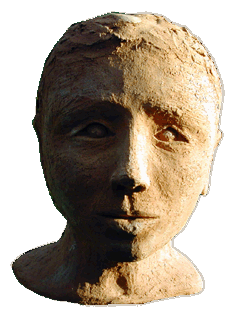
Instead, he modeled my face in clay. Ron gave me dad's sculpture on
Christmas day 1999. Dad also spent time modeling with clay. I still have an
"Indian head" that he was going to throw away. He always was trying to
talk me into letting him make a mold of my face! The way he explained
it, I'd just have to sit in a chair and he would apply plaster to my
face, leaving holes for me to breathe through my nose. Or was it that
he was thinking of poking straws in my nose to breathe through? For
some reason, I was deathly afraid that I wouldn't be able to properly
breathe, or that maybe the plaster wouldn't come off my face after it
had hardened. Besides, I remember that the plaster releases heat as it
hardens, so maybe I was just afraid that I'd fry my face or something.
Instead, he modeled my face in clay. Ron gave me dad's sculpture on
Christmas day 1999.
|